Basic Wood Joints
BASIC WOOD JOINTS
If you have any experience in woodwork you will know how important basic wood joints are and when constructing your projects. Although there are many different ways to join two pieces of wood, let’s skim through 9 basic joints that are particularly beginner-friendly in carpentry. These rely on some external source of strength such as screws, splines or glue.
1. Butt Joints.
These are just two pieces of wood attached perpendicularly to each other, often with nails or screws. They can be perfectly good joints. However, there will be no structural integrity on their own.
Butt joints can be your quick option when the work is rough or rustic or when speed matters more than looks. Just make sure your joining technique is right for the job (you might also need a metal corner bracket for extra strength, for instance). To dress up a butt joint you can either countersink or plug your nail and screw holes.
Pocket screws
Pocket joinery is great for attaching wood pieces with different grain orientations such as table aprons and legs or for making face frames. You might use it to reinforce a butt joint. Because the screws are toe-nailed at an angle into the wood, the joint is much stronger than a typical butt joint where the screws go directly into the end grain.
Pocket joinery is fast and relatively strong, but you will need a special jig and drill bit. These joints are not the prettiest so you’ll want to figure out a way to hide them.
Biscuit joinery
This method involves gluing wooden “biscuits” into slots cut into the wood. It’s an excellent way to hold together pieces of plywood or other engineered material, providing plenty of gluing surface as well as the strength of the biscuits themselves.
Biscuits are good for casework and for reinforcing and lining up edge joints, but layout can be confusing until you get the hang of it.
2. Miter Butt Joints
The mitered butt joint is basically your standard butt joint, with the edges mitered to a 45-degree angle. They have more glue surface than a straight butt joint — a plus. The two pieces of wood is fastened with nails or screws and allows for a very sleek looking finish. This joint is most often used for structuring roofs, frames and small boxes.
Thanks to the super strength of new glues, a small box made only with miters will usually hold just fine. Still, adding a spline is a good idea.
3. Edge Joints

Picture this: you need an 8-inch wide panel for your next project, but the widest board you have is only 6 inches. This is where the edge joint comes to the rescue — just by gluing the boards side-by-side.
I know what you’re thinking: Two boards glued along the edges can’t possibly be sturdy. But you’d be surprised by how strong this joint really is. If you try to break the board, the wood around the glue joint will break before the glue does. However, gluing wood fibers end to end makes the joint considerably weaker, so this should only be used to widen a board, not lengthen it.
4. Dovetail Joints
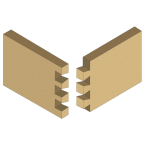
The dovetail joint is one of the strongest joints and relies on pure workmanship and very little glue; no nails required (the notches in the wood fit together like puzzle pieces). This joint is most commonly used in Furniture and Cabinet making, because it can sustain a lot of weight. The ends of the pieces (called tails and pins) interlock and make a solid joint.
Novices take note: this joint isn’t exactly simple — tight-fitting dovetails are considered to be a sign of a great woodworker. But even if you’re not well-versed in dovetail joints, even one done a bit sloppily can be very strong.
5. Mortise and Tenon Joints
The mortise and tenon joint is one of the oldest joints that are still used today and consists of one piece fitting into another. The mortise is a squared hole that is carved into the side of a piece of wood and the tenon the protruding piece that fits into the hole. This joint is known for its aesthetic beauty and is used for joining exposed beams. Therefore, it doesn’t need any glue or nails to keep its structure.
This joint might look like a butt joint from the outside, but hiding out of sight is a tenon (that is, a projecting piece of wood) that fits into the mortise (a recess) of the other piece, locking the wood together.
This method provides a lot of strength and glue surface. There are also many varieties of the mortise and tenon joint, including mortise and tenons that incorporate wedges or pins to lock the joint in place.
6. Dado Joints
The dado joint is a very simple joint; it joins together two pieces of wood by fitting one piece into the notch of the other and then fastening it with glue or nails. It is often used in joining plywood and the backs and sides of Cabinets and dressers.
One of the most common uses for the dado joint is applied in joining shelves. This method joins two pieces of wood with a groove cut into one board that a second board fits into.
7. Rabbet Joints
The rabbet joint is very similar to the dado joint, but instead of having a notch in the center of the board, it has one on the edge of it. Glue or nails are required to fit the pieces together tightly. This joint is most commonly used when two edges need to join tightly together, like doors and windows.
8. Half-Lap Joints
The half lap joint is used when two pieces of wood need to be joined in the middle, by notches cut into each one. This joint is one of the weaker ones and therefore you would need more than a small amount of glue to secure the pieces properly. This joint is used to create different types of frames and structures.
9. Tongue and Groove Joints
The tongue and groove joint consists of a slightly angled groove in one piece of wood and a tongue in another. These two pieces fit perfectly and lock together, meaning they can only be separated when lifted up at an angle (no glue or nails are needed). The most common use for this particular joint is to lay down floorboards.


21/09/2021 at 1:37 pm
Wow, fantastic weblog structure! How lengthy have you ever been running a blog for? you made running a blog look easy. The total look of your site is magnificent, as smartly as the content
02/10/2021 at 2:55 am
Thanks for your comment!
28/09/2021 at 1:57 am
I do not even know how I ended up here, but I thought this post was good.
I do not know who you are but definitely you are going to a famous blogger if you are not already
Cheers!
01/10/2021 at 11:07 am
Thanks for your comment!
09/06/2023 at 4:28 am
This article opened my eyes, I can feel your mood, your thoughts, it seems very wonderful. I hope to see more articles like this. thanks for sharing.
10/06/2023 at 4:12 pm
Very nice post. I just stumbled upon your blog and wanted to say that I’ve really enjoyed browsing your blog posts. In any case I’ll be subscribing to your feed and I hope you write again soon!
12/06/2023 at 2:56 am
Reading your article helped me a lot and I agree with you. But I still have some doubts, can you clarify for me? I’ll keep an eye out for your answers.
23/07/2023 at 5:59 pm
I like the helpful info you provide in your articles. I?ll bookmark your weblog and check again here frequently. I am quite sure I?ll learn many new stuff right here! Good luck for the next!
14/09/2023 at 4:51 am
Your article gave me a lot of inspiration, I hope you can explain your point of view in more detail, because I have some doubts, thank you.
14/09/2023 at 6:11 am
Your article gave me a lot of inspiration, I hope you can explain your point of view in more detail, because I have some doubts, thank you.
21/09/2023 at 11:46 pm
Your article gave me a lot of inspiration, I hope you can explain your point of view in more detail, because I have some doubts, thank you.
30/12/2023 at 11:27 pm
-Howdy! I just woud like to give you a huge thumbs up foor your great info you’ve got here on this post. I’ll be coming back to your site for more soon. is there a special schedule for posting ?
20/04/2024 at 2:15 pm
This is one of those articles I’ll be coming back to time and again. Incredibly useful.
20/08/2024 at 11:32 pm
Thank you very much for sharing, I learned a lot from your article. Very cool. Thanks.
21/08/2024 at 2:41 pm
An informative and well-written piece. The principles are easily understood and applied thanks to your thorough explanations and practical examples. Thank you for taking the time to provide such detailed information. Your time and knowledge are much appreciated.
03/09/2024 at 2:46 am
Your article helped me a lot, is there any more related content? Thanks!
08/09/2024 at 10:36 am
This is a fantastic piece! Your thorough research and clear explanations make it a must-read for anyone interested in the topic. I appreciate the effort you put into providing such detailed information and practical examples. Keep up the great work!
18/09/2024 at 8:17 pm
Excellent piece! Your analysis is insightful, and the material is well-organized and simple to grasp. Your study and writing of this are greatly appreciated. For those curious about this subject, it’s an excellent resource.
19/09/2024 at 3:51 pm
I appreciate you taking the time to write and share this insightful piece. Your analysis is quite thorough, and I really enjoy reading your work. This article taught me a lot, and I will be using it again and again. You are doing an excellent job.
23/09/2024 at 8:36 pm
Great article! Your insights are very valuable, and the way you presented the information made it easy to understand. I appreciate the time and effort you put into researching and writing this. It’s a great resource for anyone interested in this topic.
27/09/2024 at 9:41 pm
It was a pleasure reading this interesting and thorough article. Even while discussing more advanced subjects, your writing style remains plain and simple. This is a great post that I will be using again and again because of how much I learnt from it. You are doing an excellent job.
21/10/2024 at 11:32 pm
This article has made things much clearer for me.
07/12/2024 at 3:50 am
Thanks for sharing. I read many of your blog posts, cool, your blog is very good.
03/01/2025 at 12:34 am
Hello! I just want to give a huge thumbs up for the great data you may have here on this post. I will be coming back to your blog for extra soon.
30/01/2025 at 10:15 pm
This is such a well-crafted post—thank you for your effort!
07/02/2025 at 6:58 pm
I’m impressed by how well you explained this.